

OpenID Connect for Developers
A practical guide to OpenID Connect and OAuth 2.0: the flows, scopes, claims, tokens and servers.
OpenID Connect (OIDC) is the standard way for applications to authenticate users and get information about who they are. Applications and services get tokens from a central authorization server and use them to access protected resources. This guide is a practical introduction for developers.
Whether you are new to the protocol or want to check your understanding, you’ll find the key concepts, common use cases, and how OIDC builds on OAuth 2.0.
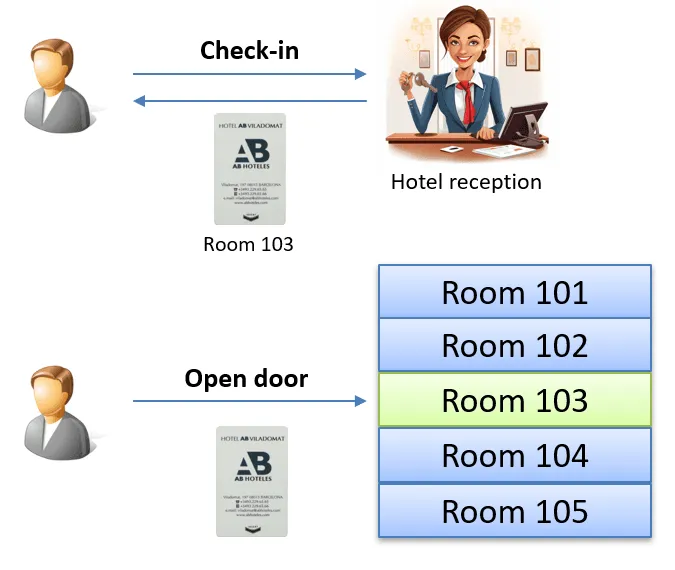
Think of it like checking into a hotel: you authenticate at the front desk and receive a key (the access token) to access a specific room during your stay.
What Is OpenID Connect?
OpenID Connect (OIDC) is an identity layer on top of the OAuth 2.0 protocol. It enables applications to verify users’ identities and securely obtain basic profile information.
The OpenID Connect specification defines OIDC as follows:
OpenID Connect 1.0 is a simple identity layer on top of the OAuth 2.0 protocol. It enables Clients to verify the identity of the End-User based on the authentication performed by an Authorization Server, as well as to obtain basic profile information about the End-User in an interoperable and REST-like manner.

Resources
What is OAuth?
In the context of OpenID Connect, OAuth version 2.x can be thought of as the “underlying plumbing” that provides the framework for secure, delegated access to resources. OAuth handles the mechanics of authorization; it allows applications to request permissions on behalf of a user without directly handling their passwords.
However, OAuth 2 alone doesn’t verify a user’s identity. It simply grants access tokens that represent permissions, not who the user is. OpenID Connect builds on OAuth 2.x and adds identity verification alongside authorization to provide users with secure authentication features.
Resources
- The OAuth 2.0 Authorization Framework (RFC 6749)
- The OAuth 2.0 Authorization Framework: Bearer Token Usage (RFC 6750)
OpenID Connect vs. OAuth 2.0
OpenID Connect (OIDC) extends OAuth 2.0 by adding an identity layer, enabling applications to authorize access and authenticate users securely.
Key additions include:
- Authentication Built on OAuth 2.0:
OIDC builds directly upon OAuth, allowing secure user authentication alongside authorization. - ID Tokens:
OpenID Connect uses ID tokens in JWT format, allowing applications to verify the user’s identity. - Claims:
OIDC adds claims, which communicate essential user information, like their name and email, to the client, alongside other vital information.
These features make OIDC a convenient, effective, and simple solution for identity verification in modern applications.
OAuth Versions
OAuth has evolved over time through several versions, with each version improving on the last to address new security and usability needs:
- OAuth 1.0
The original OAuth version, now obsolete, was introduced in 2007. While it enabled secure delegated access, OAuth 1.0 had various problems and security vulnerabilities, which led to the development of OAuth 2.0. - OAuth 2.0 (RFC 6749)
Released in 2012, it simplified the authorization process by making it easier to implement across applications. It introduced token-based authorization and eliminated the need for cryptographic signing by clients, focusing instead on access tokens. OAuth 2.0 is the foundation for modern protocols like OpenID Connect. - OAuth 2.1
OAuth 2.1, still an IETF draft, builds on OAuth 2.0 by incorporating security best practices and streamlining the framework. It removes deprecated flows like the Implicit flow, emphasizes PKCE (Proof Key for Code Exchange) for additional security, and provides more precise guidance and best practices for developers.
OAuth Grants
In OAuth 2.0, authorization grants define how an application requests tokens from the authorization server. Each grant outlines the credentials or interactions needed to obtain the token required for user access.
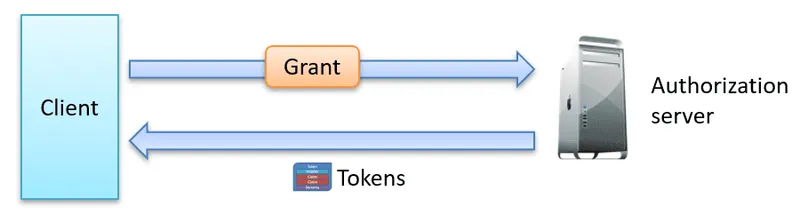
Common OAuth 2.0 Authorization Grants include:
- Authorization Code Grant
This is the most widely used grant suitable for secure token handling across server-side, mobile, and Single-Page Applications (SPAs). - Client Credentials Grant
Client credentials grants are used for service-to-service authentication without a user needing to be present. - Implicit Grant (deprecated)
Implicit grants were originally designed for browser-based applications; however, they are now deprecated in OAuth 2.1 due to their security vulnerabilities. - Resource Owner Password Credentials Grant (deprecated)
This grant allows direct access to user credentials (username and password), but this grant was deprecated in OAuth 2.1 for security reasons.
What does this mean in practice?
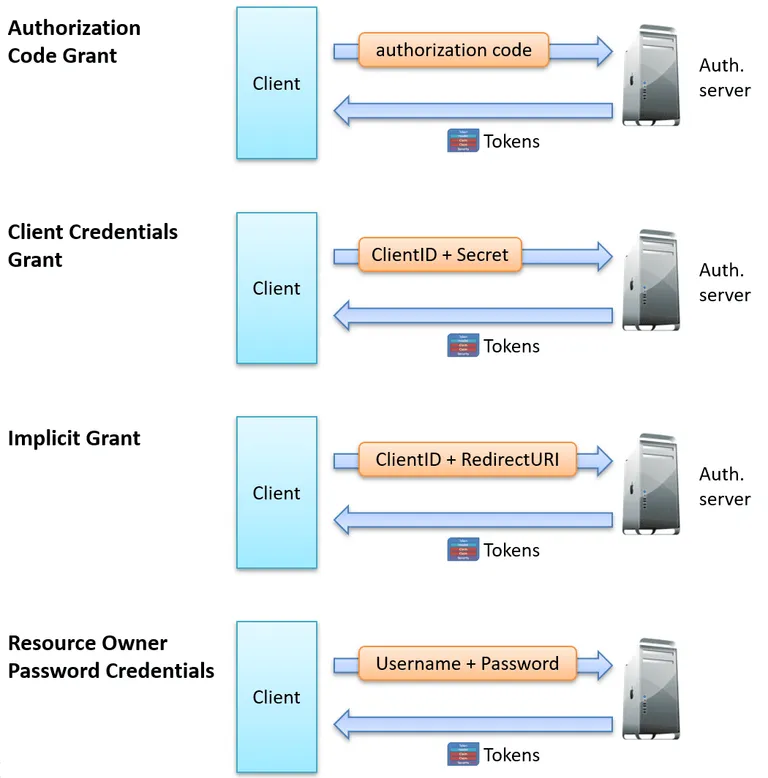
- In the Authorization Code Grant, the client provides an authorization code obtained through user authentication.
- In the Client Credentials Grant, the client presents a client ID and secret for machine-to-machine authentication.
- In the Implicit Grant, the client sends an authorization request through the user’s browser, providing parameters like the client_id and redirect_uri, and receives tokens directly in the browser’s redirect URL.
- For user-facing grants like the Resource Owner Password Credentials Grant, a username and password may be required.
The following image summarizes these grants:
Resources
- Authorization Code Grant
- Client Credentials Grant
- Implicit Grant
- Resource Owner Password Credentials Grant

OAuth 2.0 and OpenID Connect Flows
OAuth 2.0 primarily defines authorization grants, which specify the methods for obtaining access tokens. OpenID Connect is built on top of OAuth 2.0 and adds a structured approach to authentication flows. These provide clear guidelines for verifying user identities across various application types, including single-page and server-side apps.
These flows aim for a client application or service to authenticate with the authorization server and receive tokens, such as an access token. These can then be used to allow secure access to protected resources.
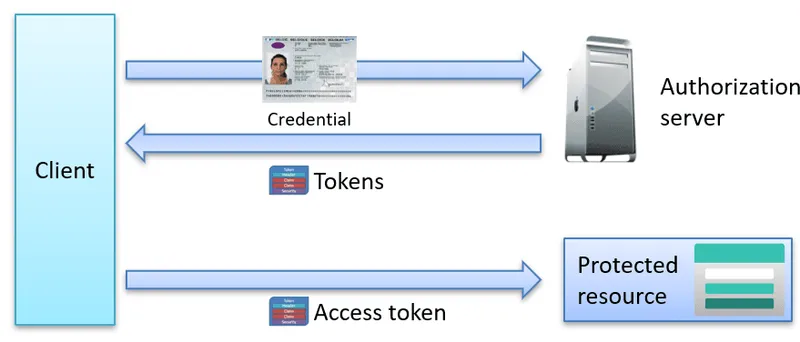
The most common OAuth 2.0 and OpenID Connect flows are:
- Client Credentials Flow:
The client credentials flow, defined in OAuth 2.0, is used for machine-to-machine (server-to-server) communication without user involvement. - Device Code Flow:
The device code flow, which is part of OAuth 2.0 and designed for devices with limited input capabilities, allows user authorization on a secondary device. - Authorization Code Flow:
The authorization code flow, defined in both OAuth 2.0 and OpenID Connect, is widely used for server-side apps, mobile apps, and SPAs. It thus allows secure backend token handling. - Implicit Flow:
The implicit flow is part of both OAuth 2.0 and OpenID Connect and is intended for client-side applications. However, due to security concerns, it is now deprecated in OAuth 2.1. - Hybrid Flow:
Unique to OpenID Connect, the hybrid flow combines elements of the Authorization Code and Implicit flows to offer flexibility. This is particularly useful for applications needing an initial ID token with further secure exchanges. - Resource Owner Password Credentials (ROPC) Flow:
The ROPC flow allows clients to request tokens using the user’s credentials (username and password), but it is also deprecated due to security concerns.
Many other flows exist, but the flows above are the most widely used in OAuth 2.0 and OpenID Connect implementations.
Client Credentials Flow
The Client Credentials Flow is used for service-to-service communication, where an application (the client) needs to access resources or APIs on behalf of itself rather than a user. In this flow, the client application authenticates directly with the authorization server using its client ID and secret to obtain an access token. This token then grants the client permission to call APIs and perform tasks like retrieving data or managing resources without user involvement.
How the Client Credentials Flow works:
- Authenticate:
The service/client first authenticates with the authorization server to acquire the access token. - Send Requests:
The service sends the access token with its requests to the API. - Verify Token:
The API typically downloads the public signing keys to verify the access token’s signature.
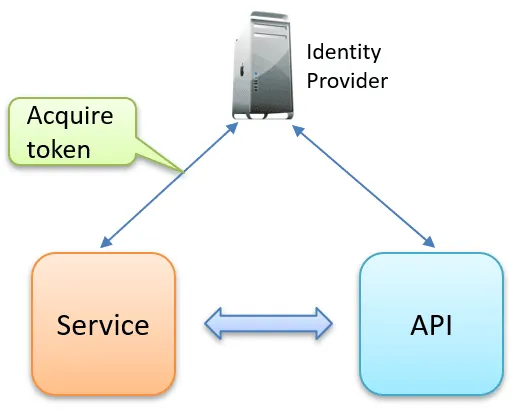
This flow is typically used by background processes, automated jobs, or applications that must interact securely with other services. No user is involved.
Device Code Flow
The Device Code Flow (OAuth 2.0 Device Authorization Grant) is designed for devices with limited input capabilities, like smart TVs or IoT devices. Since these devices can’t easily handle user logins, the flow allows users to authorize the device on a separate device, like a smartphone or computer.
Here’s how the Device Code Flow works:
- The device initiates the flow by sending a request to the authorization server for a unique code and a verification URL.
- Then, the device displays the code or URL to the user, who is asked to visit the URL on another device.
- Next, the user completes the authentication and authorization on their secondary device.
- The original device polls the authorization server until it gets an access token, enabling secure access to resources.
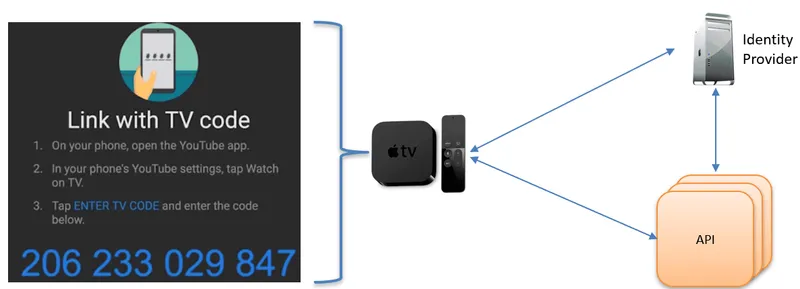
This approach makes it user-friendly for constrained environments while keeping the authentication secure.
Resources
Authorization Code Flow
The Authorization Code Flow is the most widely used OAuth 2.0 and OpenID Connect flow. Server-side web apps use it with a client secret, and together with PKCE it is also the recommended flow for mobile apps and SPAs, which cannot keep a secret. It replaces the Implicit Flow, which is deprecated due to security vulnerabilities, especially token exposure in browsers.
How the Authorization Code Flow works:
- The user is redirected to the authorization server for authentication.
- Upon success, an authorization code is returned to the client.
- The client exchanges this code for an access token (optionally an ID and refresh token) through a direct request to the authorization server, not via the browser.
Because the tokens never pass through the browser URL, the Authorization Code Flow avoids many of the security risks of the Implicit Flow.
Implicit Flow
The Implicit Flow is designed primarily for client-side applications, such as single-page applications (SPAs) that run in a browser. Unlike the Authorization Code Flow, where tokens are retrieved through a secure server-to-server exchange, the Implicit Flow delivers tokens (both ID and access tokens) directly to the client application via the browser.
This approach removes the need for a backend server in the authentication process, which makes it simpler and faster. However, it is also less secure, as the tokens are exposed in the URL and, therefore, susceptible to interception.
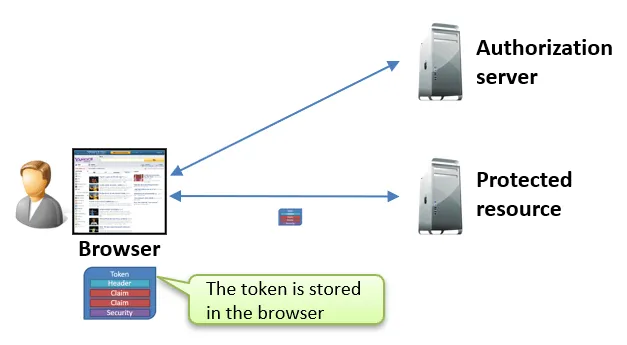
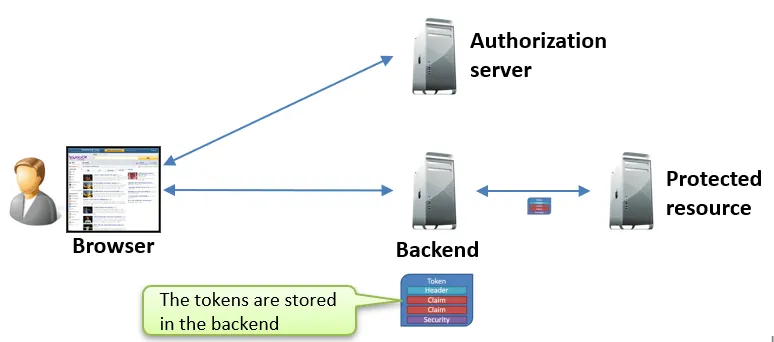
Another use case involves authenticating a user in the frontend and passing tokens to a backend via the browser for further processing or resource access. While rare, this approach is covered by the OAuth 2.0 Form Post Response Mode specification, which allows tokens to be delivered more securely in an HTTP POST body rather than in the URL.
Why Was the Implicit Flow Created?
The Implicit Flow was developed in an era when:
- Browser-Based SPAs Were Rare:
Single-page applications (SPAs) as we know them today didn’t exist, so there was a limited need for secure token handling on the client side. - Mobile Apps Were Not Yet the Focus:
Mobile apps were not yet the mainstream platform they are today, so there was little demand for secure token flows suited to mobile environments. - Cross-Domain Requests Were Restricted:
Due to the Same-Origin Policy, browsers blocked cross-domain requests. This prevented applications from securely exchanging authorization codes or tokens with backend services. Since CORS (Cross-Origin Resource Sharing) was not yet supported, the Implicit Flow offered a workaround by delivering tokens directly via URLs.
These constraints led to the creation of the Implicit Flow as a simpler, client-side solution for retrieving tokens. However, with the advancement of web standards like CORS and the rise of SPAs and mobile apps, the Authorization Code Flow with PKCE is now the preferred method for secure client-side authentication.
Resources
Hybrid Flow
The Hybrid Flow is unique to OpenID Connect, combining features of both the Authorization Code Flow and the Implicit Flow. This gives more flexibility by allowing applications to obtain ID tokens immediately while securely exchanging an authorization code for access tokens.
How the Hybrid Flow Works:
- During authentication, the client can request both an ID token and an authorization code.
- The ID token is received directly from the authorization server, giving instant access to user information, while the authorization code is exchanged later on the backend for any additional tokens.
This flow benefits applications needing immediate user information and enhanced security for subsequent API requests.
Resources
Resource Owner Password Credentials
The Resource Owner Password Credentials (ROPC) Flow is an OAuth 2.0 method in which users provide their username and password directly to the application, which then uses these credentials to obtain tokens from the authorization server. While this flow can be useful for trusted applications, it has many more security risks since it exposes user credentials to the client.
Deprecation Note: Due to these vulnerabilities and the availability of more secure flows, ROPC is now considered deprecated and is generally discouraged in favor of safer options like the Authorization Code Flow with PKCE.
Resources
Proof Key for Code Exchange (PKCE)
Proof Key for Code Exchange (PKCE) is a security enhancement for the Authorization Code Flow. PKCE was initially designed for mobile and public clients who can’t securely store a client’s secret. PKCE helps protect against interception attacks, such as the authorization code interception attack.
How PKCE works:
- When initiating the flow, the client generates a random code verifier and a corresponding code challenge.
- The authorization request includes the code challenge, and when exchanging the code for tokens, the client must send the original code verifier to prove it initiated the request.
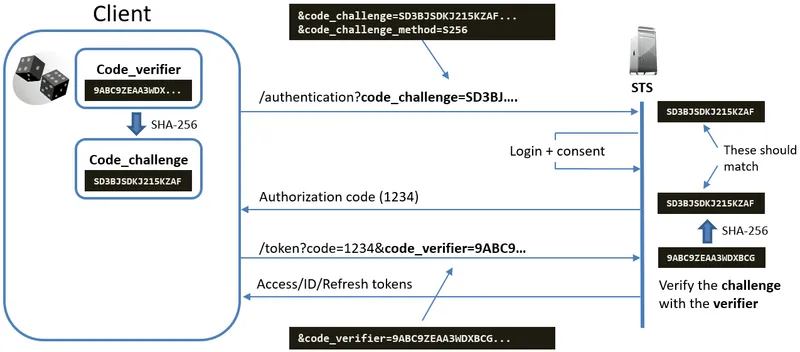
This mechanism ensures that an attacker can’t use an authorization code without the code verifier even if the authorization code is intercepted.
PKCE is no longer only for mobile and public clients. The OAuth 2.0 Security Best Current Practice (RFC 9700) and OAuth 2.1 recommend it for all clients, including server-side web apps.
Resources
- Proof Key for Code Exchange by OAuth Public Clients (RFC 7636)
- OWASP OAuth 2.0 Protocol Cheatsheet
- OAuth 2.0 authentication vulnerabilities
Pushed Authorization Requests (PAR)
Pushed Authorization Requests (PAR) enhance OAuth and OpenID Connect flows by securely transmitting authorization parameters through a back channel instead of browser URLs.
Traditionally, the authorization request parameters, such as client_id, redirect_uri and scopes, travel in the browser URL, where they can be seen and changed. PAR addresses this by allowing these parameters to be sent via a direct HTTP request from the client to the authorization server, making them less susceptible to tampering and interception.
PAR greatly improves security, ensures tamper resistance, and prevents issues caused by excessively long URLs in complex authorization scenarios.
For more details about PAR, head over to my Pushed Authorization Requests (PAR) in ASP.NET Core 9 blog post, which covers this topic in more depth.
Resources
- Pushed Authorization Requests (PAR) in ASP.NET Core 9
- RFC 9126 – OAuth 2.0 Pushed Authorization Requests
What are OpenID Connect Scopes?
Scopes in OpenID Connect serve a dual purpose: they request information about a user and define access to specific resources. This dual role is sometimes misunderstood, as scopes relate to gathering user details and specifying permissions for an application to act on the user’s behalf.
For example:
- openid:
Requests the user’s identity and an ID token. - profile:
Asks for profile details like name and picture. - email:
Grants access to the user’s email address. - payment:
Requests permission to initiate or manage payment transactions on behalf of the user.
Using scopes, applications can limit their data requests to what is necessary, which is good for both security and privacy. The image below shows the two roles:
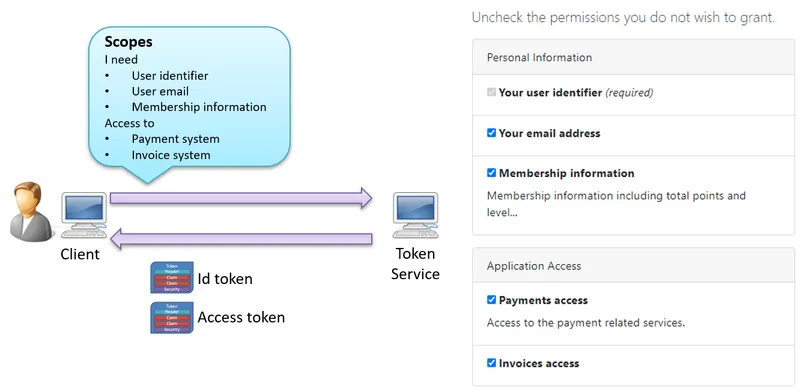
The OpenID Connect scopes are defined in the OpenID Connect Core 1.0 specification. The document outlines standard scopes such as openid, profile, email, address, and phone, which dictate the user information a client can request from an identity provider.
What are Claims?
Claims are key-value pairs that convey information about the user or the authentication event. Technically, claims are just strings that can hold any name and value. Each claim has:
- key
The name of the claim, like email, role or sub. - value
The actual data, such as the user’s email address or unique ID.
For instance:
- email: “user@example.com”
- name: “John Doe”
These claims help applications personalize and manage access securely, while custom claims can also be defined to fit specific application needs.
If you’re encountering issues with claims in your application, check out these posts for practical debugging tips:
- Debugging JwtBearer Claim Problems in ASP.NET Core
- Debugging OpenID Connect Claim Problems in ASP.NET Core
Resources
- OpenID Connect Core 1.0 Specification
- OpenID Connect Scope and Claims: Explains how scopes relate to claims.
- JWT (JSON Web Token) Claims: Background on how claims are structured in JWTs.
- OpenID Connect Implementer’s Guide
OpenID Connect Tokens
With OpenID Connect, we deal with three types of tokens:
- ID Token
- Access Token
- Refresh Token
Let’s explore these tokens and what they represent.
ID Token
A common myth about the ID token is that it represents the user’s identity, but this is not entirely true.
The ID token confirms the user’s identity but also includes important details about the authentication process. For example, besides identifying the user, it has claims that show when and how the user authenticated.
What the ID Token Represents:
- Proof of Authentication:
The ID token confirms that the identity provider has successfully authenticated the user. It provides evidence that the user underwent an authentication process, such as signing in with a password, using two-factor authentication, or another method. - Context of Authentication:
The token may also carry claims related to the authentication event, like:- auth_time:
When the user was authenticated. - acr:
The Authentication Context Class Reference, which indicates the strength or method of the authentication (e.g., password-based, multi-factor, etc.).
- auth_time:
- Identity Claims:
The ID token typically includes some claims about the user’s identity, such as name and email, though these are not always necessary. Its primary role is to confirm that authentication occurred.
Why are not all the claims part of the ID token?
To keep the ID token compact, identity claims like the user’s name, email, or profile information may not always be fully included. Instead, OpenID Connect provides a way to fetch additional user information using the UserInfo endpoint.
Here is a sample ID-Token with a header and payload:
Header:
{
"alg": "RS256",
"kid": "585070ED8E048DC512D28B7BA794A23C",
"typ": "JWT"
}
Payload:
{
"iss": "https://identity.example.com",
"nbf": 1731175206,
"iat": 1731175206,
"exp": 1731175506,
"aud": "localtestme-addoidc-client",
"amr": [
"pwd"
],
"nonce": "638667720018252814.YjdmYTdhOTgtND...",
"at_hash": "awuoS2auAy_XxhsNNSPg8Q",
"sid": "B26D5BCAF60E97F157BBD7C5A005F2EF",
"sub": "2",
"auth_time": 1731175205,
"idp": "local",
"name": "Bob Smith",
"given_name": "Bob",
"family_name": "Smith",
"email": "bob.smith@example.com",
"email_verified": true,
"website": "https://bob.example.com"
}
Access Token
An access token is like a hotel key; just as a hotel key gives you access to specific rooms and areas within the hotel, an access token grants an application access to specific resources on behalf of a user.
What it is:
- An access token is issued by an authorization server when a user logs in or grants permission to an app.
- It’s typically a JWT (JSON Web Token) or an opaque string and carries information about the app’s access permissions.
What it does:
- The token doesn’t represent the user directly but acts as a way to authorize an app to access resources. For instance, if an app needs to fetch a user’s contacts or photos, it must present the access token to prove it has permission.
- The resource server (like an API) checks the access token to determine if the request is allowed.
Key elements of an Access Token:
- Scopes: Define what the token permits, such as reading emails or accessing a profile photo.
- Expiration: Access tokens have a limited lifespan for security. Once it expires, a new one is required.
- Audience (aud): Specifies which API or service the token is intended for.
Sample access token:
Header:
{
  "alg": "RS256",
  "kid": "585070ED8E048DC512D28B7BA794A23C",
  "typ": "at+jwt"
}
Payload:
{
  "iss": "https://identity.example.com",
  "nbf": 1731175206,
  "iat": 1731175206,
  "exp": 1731175221,
  "scope": [
	"openid",
	"profile",
	"email",
	"offline_access"
  ],
  "amr": [
	"pwd"
  ],
  "client_id": "localtest",
  "sub": "2",
  "auth_time": 1731175205,
  "idp": "local",
  "sid": "B26D5BCAF60E97F157BBD7C5A005F2EF",
  "jti": "65797782F504C3E1E5A0039D8038076F"
}
Refresh Token
A refresh token is like the keycard you keep after your hotel room key expires. Imagine staying in a hotel where your room key only works for 24 hours. Instead of going through the entire check-in process daily, you use your keycard at the front desk to get a new room key. Similarly, a refresh token is used to get a new access token when the old one expires.
What It Is:
- A refresh token is issued alongside the access token but is generally longer-lived.
- It’s a secure way for an application to maintain access to resources without needing the user to sign in again.
What It Does:
- When the access token expires (since access tokens are short-lived for security), the app can use the refresh token to request a new access token from the authorization server.
- This allows the user to remain signed in without frequent interruptions or having to re-enter their credentials.
Security Considerations:
- Refresh tokens should be kept secure and never shared. They are powerful because they can be used repeatedly to obtain new access tokens.
- Typically, refresh tokens are stored securely on the client side, often encrypted or protected by secure mechanisms.
- There are two types of refresh tokens. The traditional type can be used multiple times until it expires. The more secure approach is refresh token rotation: each refresh token can be used only once, and the client gets a new one every time it refreshes. If an old refresh token is used again, for example by an attacker who stole it, the authorization server can detect the reuse and revoke the whole chain of tokens.
Sample refresh token:
FFC28AEE658D1D0EA63C3FFA267BBF5FA70B953842AB62BBAA35A5749E68627-1A refresh token typically looks like a long, random string of characters designed to be unique and impossible to guess. It may be an opaque string or, in some cases, a structured token like a JSON Web Token (JWT). However, it usually doesn’t contain readable information and is primarily used securely between the client and the authorization server.
OpenID Connect Servers
With many authorization services supporting OpenID Connect, choosing the right one can be challenging. A certified implementation is highly recommended, as certified servers will have passed the OpenID Foundation’s compatibility tests, ensuring they meet the OIDC standard.
Popular OpenID Connect implementations include:
- Keycloak
An open-source identity provider offering OIDC, designed for flexibility and ease of integration. - Duende IdentityServer
A widely used, standards-compliant solution for ASP.NET Core, ideal for custom identity and access management in .NET applications. - Entra ID
Microsoft’s enterprise-grade identity provider supports OIDC for secure enterprise applications. It was previously called Azure Active Directory. - Auth0
Part of Okta. A cloud-based platform that offers comprehensive OIDC and OAuth 2.0 support with easy integration across various applications.
Resources
Feedback Welcome
Have you spotted an error or a typo, or have an idea for improving this guide? I would like to hear about it. You find my details on the contact page.
OpenID Connect FAQ
Let me know if you want to contribute an entry to this FAQ.
Authentication vs. Authorization?
A common confusion is about the difference between authentication and authorization:
- Authentication
It is the process of verifying who the user or system is. It confirms identity, typically through login credentials. - Authorization
Determines what the authenticated user or system is allowed to do, such as accessing specific resources or performing certain actions.
The important thing to remember is that you always do authentication first and then authorization. You can’t decide if the request is allowed or not if you don’t know the caller’s identity first.

What is FAPI?
FAPI stands for Financial-grade API, a set of security standards developed by the OpenID Foundation for protecting highly sensitive financial data in APIs. FAPI is designed to enhance security and privacy in the financial sector, such as in open banking systems, by ensuring that API requests and responses are secure and tamper-proof.
FAPI includes specifications like:
- FAPI 1.0 and 2.0:
These outline strict requirements for securing authorization and authentication mechanisms, with features like stronger client authentication and cryptographic protections. - Advanced Security Measures:
FAPI 2.0 requires Pushed Authorization Requests (PAR) and sender-constrained access tokens, bound to the client with mutual TLS or DPoP, to meet the security demands of financial transactions.
FAPI is important in environments where protecting user data is a legal or regulatory requirement, and it is being widely adopted in industries like banking and financial services.
Read more at the FAPI Working Group website.
What is a Relying Party (RP)?
Relying Parties (RPs), or clients, are applications or systems that use OpenID Connect or OAuth to authenticate users and access their data. The RP depends on an identity provider (IdP) to handle user authentication and issue tokens, which the RP then uses to authorize and personalize the user’s experience.
Relying Parties can be any type of client, such as a web app, mobile app, or a service that interacts with APIs. While the RP itself does not act as an API, it may use APIs provided by identity providers to manage authentication and authorization flows.
In simpler terms, the RP is always the client application in the OAuth or OpenID Connect ecosystem that seeks to authenticate users and access protected resources.
What is a Resource Owner?
In OAuth and OpenID Connect, the resource owner is typically the user who owns the data that an application (or client) wants to access. The resource owner has control over the data and must give explicit permission for a client to access it.
For example, you are the resource owner if you’re using an app that wants to access your email contacts through Google. You decide whether or not to grant the app permission to access your information. In most scenarios, the resource owner is a human user, but it could also be a service or application in specific automated environments.
What is a Resource Server?
A Resource Server is the server that hosts the protected resources an application wants to access using OAuth 2.0 or OpenID Connect. It receives and processes requests containing access tokens issued by the authorization server and determines whether the request is valid and authorized. This server is typically an API that checks the access token on each request to control access to its data.
What is the difference between OpenID and OpenID Connect?
Although the names are similar, OpenID and OpenID Connect are different protocols, both managed by the OpenID Foundation.
- OpenID
Was a decentralized identity protocol that allowed users to use one set of credentials across multiple sites. Today, it’s obsolete mainly due to its limited security features. The specification for OpenID can be found in the OpenID Authentication 2.0 – Final specification. - OpenID Connect (OIDC)
Builds on OAuth 2.0 to add modern identity verification and authentication to applications, making it a secure and widely used choice for handling user identities.
What is the difference between SAML and OpenID Connect?
Security Assertion Markup Language (SAML) and OpenID Connect (OIDC) are both protocols for federated identity, but they serve different environments and use cases.
SAML is an older protocol designed for secure, single sign-on (SSO) primarily in enterprise environments and on-premise solutions. It uses XML for data exchange, which can make it more complex to implement and troubleshoot compared to OpenID Connect’s JSON-based structure. Despite its age, SAML is still widely used in enterprises due to legacy compatibility and strong support within existing infrastructure.
For new projects, migrating to OpenID Connect is often recommended because of its streamlined integration, mobile support, and ease of use.
What is the difference between a flow and a grant?
In OAuth and OpenID Connect, a grant refers to a specific way an application requests a token (like the Authorization Code Grant). At the same time, a flow describes the entire process and steps involved in obtaining those tokens. Essentially, a grant is the type of permission, and the flow is how it’s carried out.
What is unique about the subject claim?
The subject (sub) claim is the unique, unchanging identifier for a user within a specific identity provider. It can be a GUID, a user ID or a random string, as long as it never changes and is never reused for another user. Avoid values that can change, such as an email address. Stability matters most in federated authentication (like social logins with Google, Facebook, or GitHub), where each provider has its own sub format. Sub values can vary widely, and two providers can use the same value for different users, so use the issuer (iss) and sub together as the key for a user.
Which OpenID Connect Authorization Service Should I Use?
It depends on your situation. Look at the flows you need, how much you need to customize, your security and compliance requirements (such as FAPI), and how well it fits your technology stack. If you are new to OIDC, good documentation matters a lot, and older systems may need extra work to connect. Choose a service that fits your complexity and budget today and what you are likely to need later.
If you want help choosing, get in touch for a no-obligation chat.
OIDC Workshops and Development
OpenID Connect Training Workshops
If you want to learn this in a more structured way, I provide several in-person and online workshops, including:
- Introduction to OpenID Connect and OAuth
- Authentication and Authorization in ASP.NET Core
- Web Security Fundamentals
They cover OIDC and security in general: how to secure web applications and APIs, and how to put the standards to work in practice. More workshops and talks are on my training page.

OIDC Development Services
Do you need to build an authentication and authorization solution that is simple, secure by design and easy to change? I can help with guidance, mentoring, code reviews or hands-on development, for one developer or a whole team, based on decades of development experience in areas such as .NET, Azure and OIDC.
Get in touch, or read more on my services page. If you use Duende IdentityServer, see my IdentityServer consulting and training page.
Video Courses on Dometrain
Prefer to learn on your own, at your own pace? I have two on-demand video courses on Dometrain.
Getting Started: OpenID Connect
How OAuth 2 and OpenID Connect work at the protocol level, whatever language you use. Over 10 hours of material.

Getting Started: Authentication and Authorization in .NET
How authentication and authorization work inside ASP.NET Core, from ClaimsPrincipal and cookies to policies. Over 12 hours of material.
Blog posts about authentication
I often write about authentication, security and OpenID Connect on my blog. Some of the posts:
- Improving ASP.NET Core Security By Putting Your Cookies On A Diet
- Demystifying OpenID Connect’s State and Nonce Parameters in ASP.NET Core
- Exploring what is inside the ASP.NET Core cookies
- Debugging OpenID Connect Claim Problems in ASP.NET Core
- IdentityServer in Docker Containers
- Pushed Authorization Requests (PAR) in ASP.NET Core 9